Search result
Sound bar
Top panel

Power operation button (  )
)
Turns the sound bar power on/off (standby). link
Input source select button (  )
)
This selects the input source.
Switches the input source each time the button is pressed. link
Bluetooth button (  )
)
Switches the input source to “Bluetooth”. link
Used to pair with Bluetooth devices. link
Volume buttons (+, –)
These adjusts the volume level. link
Front panel

Visual Indicator LEDs
Please refer to the Visual indicator LEDslink for LED color and state meaning.
Status LED
Please refer to the Status LED tablelink for LED color and state meaning.
Remote control sensor
This receives signals from the remote control unit. link
Visual indicator LEDs
Indicates input source, sound bar volume, night mode, dialogue, subwoofer volume and sound modes.

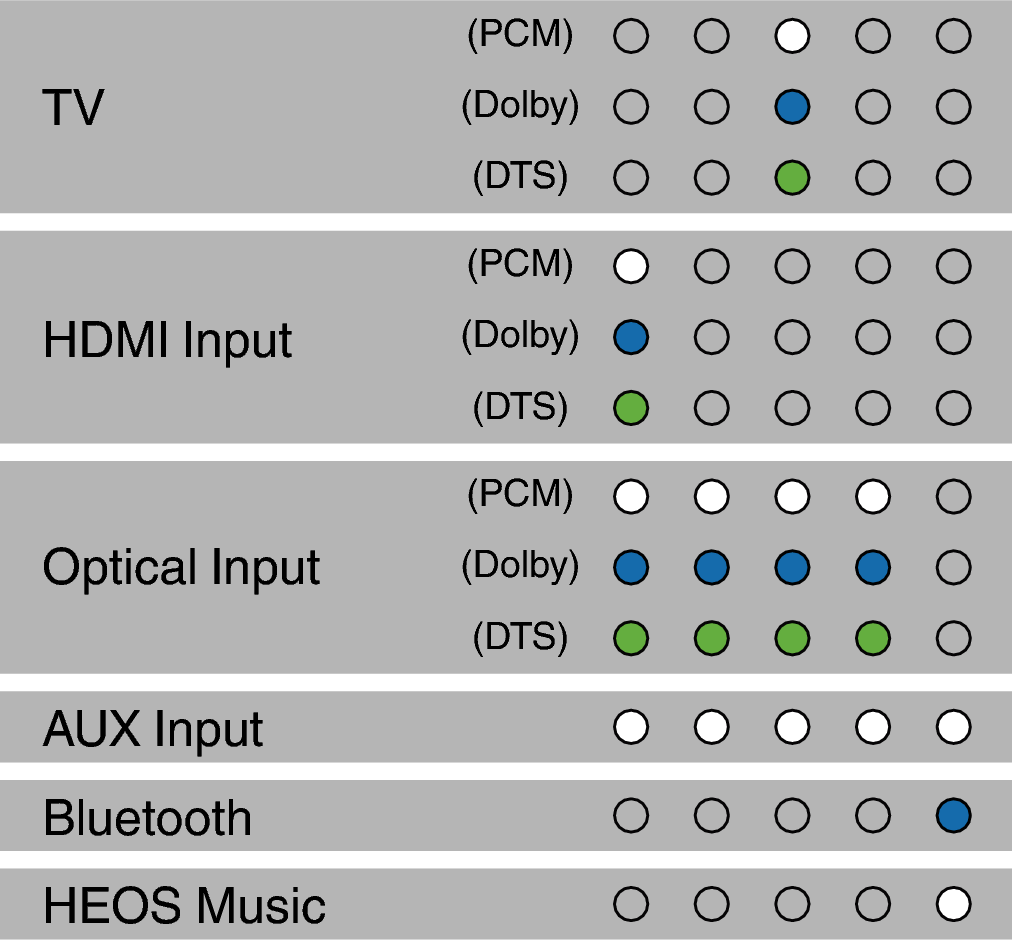
Input source indication
Input sources are indicated as follows. When the input source is TV, HDMI Input, or Optical Input, the color changes depending on the type of audio signal that is input.
Refer to Playing TV, movies and musiclink for how to set the input source.
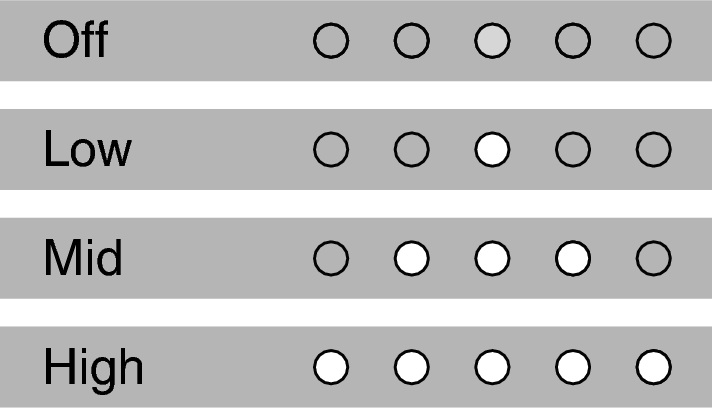
Volume level indication
Volume level will be indicated with 5 LEDs. Each LED will have 5 levels of brightness to indicate volume. Volume 1% will be indicated with the left most volume dimly lit, volume 100% will be indicated with all 5 volume LEDs fully illuminated.

Volume indicators will illuminate in purple instead of white to indicate the state of Night Mode.

Refer to Adjusting the volumelink for how to adjust the volume.
Refer to Setting the night modelink for how to set the night mode.
Dialogue indication
Depending on the settings of the dialogue function for adjustment of the volume of dialogue in movies and vocals in music, the indication is as follows.
Refer to Adjusting the dialogue soundlink for how to configure the Dialogue settings.
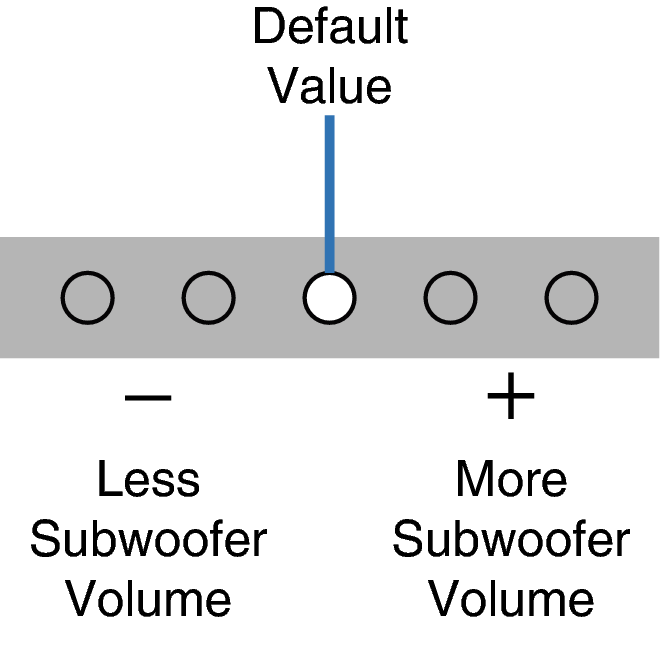
Subwoofer volume indication
The volume of the subwoofer is indicated by 5 LEDs. The default settings are ±0 and the center LED lights up. As the subwoofer volume increases, the LEDs light up in order from the center to the right. Conversely, as the subwoofer volume decreases, the LEDs light up in order from the center to the left.
Refer to Adjusting the subwoofer volumelink for how to adjust the volume of the subwoofer.
Sound mode indication
The indication depends on the selected sound modes. link
Rear panel

Wall hook hole
Used to mount the sound bar on a wall. link
CONNECT button
Used for Wi-Fi setup.
SYNC button
Used to wirelessly connect the sound bar and subwoofer. link
POWER inlet
Used to connect the power cord. link
USB port
This is used to connect USB storages (such as USB flash drives). link
NETWORK connector
Used to connect this unit to a wired Ethernet network. link
CONNECT / SYNC LED
Indicates the status of this unit. link
AUX audio input connector
Use a commercially available 3.5 mm stereo audio cable to connect a TV with an AUX audio output connector. link
Optical digital input connector (OPTICAL)
Use the included optical cable to connect a TV with an optical digital terminal. link
HDMI OUT connector (eARC/ARC)
Use the included HDMI cable to connect an eARC or ARC function-compatible TV. link
HDMI IN connector
Used to connect to the HDMI equipment with an HDMI cable. link